
How to bleed your brakes one man operation with a Brake Bleeder Vacuum Pump or Without a Vacuum Pump needing a two man operation
When it comes to your vehicle one of the most crucial system is your braking system. After years of driving your brakes can become weak or spongy, and not be as responsive as they should be. To solve this problem all it takes is a little money, some time, some skill, and some patience. I am not going to say that ever person can do this project, but I would say for someone who has had some technical experience with vehicles this task can be accomplished. Just remember when starting this project to allow for lots of extra time, because it is better to do something slow and take your time, rather than have problems because you hurried through it. I will start by explaining the principle behind brake bleeding. Your brake system is a basic hydraulic system. This means that it is operated by pressurized fluid; however, after time this fluid can break down or get air in the system which leads to a decrease in braking performance. This air can come from a old brake fluid which has boiled and caused air to get into the system. To correct this problem the vehicles brake system needs to be bled of all and any air which may have leaked into the system over the years.
Now before I start with the procedure, there are a couple things that we will need to talk about. First, this process is a fairly difficult process and may take lots of time, so allow for more time than should be needed. Second, brake fluid is very harmful to any painted surface it comes into contact with, so any painted area that may contact brake fluid should be cover with plastic and then rinsed off when you are done. Finally, brake fluid has several different DOT ratings which are all different, and these ratings should not be mixed so consult your service manual for the proper brake fluid before purchasing. The Procedure 1. Purchase all the necessary equipment. This includes:
-
Brake fluid ( correct DOT rating a couple of cans)
- Proper wrenches (You will need an open end wrenches for the brake bleeder screw).
- Possibly penetrating oil found at you local auto parts store (For if your bleeder screw is stuck)
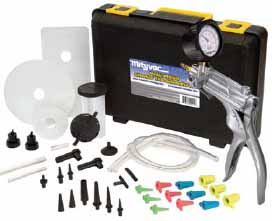
- Either a vacuum bleeder such as one from this list Mityvac Bleeders or a hose and a clear container. (The Mityvac vacuum pumps work when you have a one man operation. See the above video)
- Lug nut wrench to remove your tires
- A jack and jack stands
- Rags
- Sheets of plastic (To cover any painted surface near where brake fluid will be)
2. Park your vehicle in a place where it will be able to sit for awhile.
3. Now a couple hours before you start if you can get to your bleeder screw located on your caliper spray some penetrating oil on the screws to help loosen them up.
4. Jack up the front of the vehicle after block the rear tires. Make sure to use a proper jack point and to secure with jack stands.
5. Now jack up the rear of the vehicle using the proper jack spot and use jack stands.
6. Now take your lug wrench and remove all four wheels and tires. (I like to set the tires underneath my vehicle just in case it falls so it will fall on the tires. Just a little extra safety.)
7. Now open your hood on your vehicle.
8. Locate your master cylinder for your brakes it is located on the driver side on the firewall. If you are having trouble locating your master cylinder, look in your service manual for your specific vehicle.
9. Now that you have located this put plastic sheets on your fender on the side of the master cylinder. Also put plastic onto anything around the master cylinder to prevent the brake fluid from accidentally being spilled on something painted.
10. Now that you have your vehicle almost ready check all your bleeder screws quick to make sure that you can remove them. Don’t remove them just make sure you can break them loose. TIP: Use a six point socket when removing stuck bleeder screws to break them loose. If you still can not get them loose you will need to get them out and this way will help you remove them without breaking them off. You will however need to buy new bleeder screws, but at least you can get them out easily. The main reason that bleeder screws break off when they are stuck is because they are hollow. To prevent this take a 1/8 nail from a rivet and just pound the nail into the bleeder screw. Once you get the nail in you can cut off the exposed nail and take your socket and twist the bleeder screw out. You will have to purchase a new bleeder screw. Make sure to reinstall the covers on your bleeders when done, to prevent bleeders from becoming stuck again.
11. Now you are ready to start. Remove your master cylinder cover.
12. For this next part you can either use your Mityvac brake bleeder or a turkey baster to remove all of the old fluid from the master cylinder. 13. After removing the old fluid replace with your new fluid and fill full. Reinstall the cover.
14. Now the process for bleeding the brakes with a vacuum bleeder is much easier than by the old way. With the vacuum bleeder you would go to the wheel farthest away from the master cylinder which is usually the passenger side back wheel. You would take your hose from your vacuum bleeder and put on the bleeder screw. You would pump the hand pump a couple of times and then open the bleeder screw and quickly close the screw shut. You would repeat until no air bubbles came out.
15. Now while doing this you need to periodically check the master cylinder to make sure it is full of fluid and refill it if it is getting low. You never want it to run out this would cause air to get into the system. Also make sure that your master cylinder cover is in place while you bleed the brakes.
16. Now when you are done with the passenger side back wheel you would move onto the other back wheel, then the passenger side wheel, and finally the driver side wheel. You just repeat the steps on the above way of bleeding with periodically checking to make sure your master cylinder doesn’t get low.
17. Now the old fashioned way of doing this is much more difficult. You need another person to sit inside the car. So get a buddy to help and sit inside the vehicle, while you move to the passenger side back wheel and hook a clear hose up to the bleed screw. You should run this hose into a clear jar. Now take your helper and have them sit in the vehicle. Tell them to go down slow on the brake pedal, just a little just as they would brake to keep a car in gear still. Make sure they hold it there and do not press the pedal all the way down. Have them signal you and you open the bleeder screw ¼ turn and let the fluid come out, then close it. Now you can tell them to release the pedal. Now you will have to repeat this step until all of the old fluid and air bubbles are out of that wheel. Then move on in the order I stated above going to the next rear wheel, then the passenger side, and finally the driver side, making sure to always fill the master cylinder.
18. After all of the wheels are done the pedal should feel stiffer.
19. Make sure to top off your master cylinder and reinstall the cover.
20. Replace your wheels with properly installed lug nuts.
21. Lower your vehicle back to the ground.
22. Start your vehicle and drive slowly and brake to make sure your brakes work correctly.
23. Rinse your vehicle off to make sure no brake fluid got on the paint.
24. Finally dispose of your old brake fluid by taking it to the proper place. Now that you have successfully bled your brakes you can sit back and relax, knowing the self satisfaction of doing it yourself and saving some money. Written by: Cody Mammenga an NDSCS Student
Tags: bleeding brakes, Brake Bleeding one man, brake bleeding tools, Brakes, how to bleed your brakes, Mityvac Brake Bleeder, Mityvac MV8500, vacuum bleeder