
How to test your battery, alternator, and starter all in a few simple steps 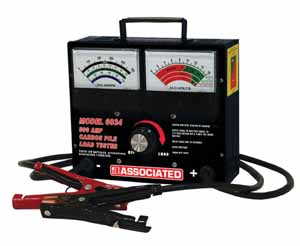
This article will discuss another way to test your starter when compared to the previous article, and it will also show you a simple way to test your battery and alternator accurately. This procedure is extremely simple and you will only need a few special tools. This procedure will help make sure that you correctly diagnose your vehicle.
The Procedure
- You will want to park your vehicle in a location where it can sit for an hour. The testing itself will not take that long, but there are some things that will make it take that long.
- After you have your vehicle parked, let it sit for 15 minutes with everything off in the vehicle and make sure you do not open the door at all, so it is a good idea to pop your hood before you let it sit for the 15 minutes. This will give your battery time to settle down and will help you get a more accurate reading when you test it with your meter.
- Once the 15 minutes are up you are ready to test the batteries voltage. To do so simply take your voltmeter and connect the leads to the battery. You should have no lower than 12.4 volts. If you do you are going to want to charge your battery and again let it sit and test. If it will not stay above 12.4 volts then your battery may be in need of being replaced soon. If you need a multimeter this page has plenty to choose from for electrical testing.
- Now that you have tested your battery you are ready to do a battery load test. This is a simple and easy way to test your battery and really understand what kind of shape it is in. You will however need to purchase a battery load tester such as this ATD 5488. This tester will allow you to properly test batteries up to 1000 cold cranking amps. Ok before you start your load test you will need to locate the cold cranking amp rating on your battery. Once you have located the cold cranking amp rating you are going to want to divide this in half and use this to apply half the amperage with your load tester.
- You have all of the information needed so it is time to hook up the load tester. Connect the cables to the correct battery posts. On the tester the voltage should show up on the needle. Next you are going to want to turn the dial until you get to the amperage you found from above by dividing your cold cranking amperage in half. You will want to keep the amperage needle as close to this as you can for 15 seconds. After 15 seconds keep holding the dial and check the voltage. This is your state of charge on your battery. A good battery will be above 9.6 volts.
- After taking the appropriate action after diagnosing your state of charge on your battery you are ready to move onto the simple test of testing the starter and battery at the same time. To do this test leave your load tester connected.
- With the load tester you will just want to take note of the battery voltage.
- Now you are going to need to have a way to measure the amperage so you will want to take the inductive clamp from your multimeter and place around any cables coming out of the positive side of the battery clamps.
- Next you are going to want to remove your fuel pump fuse to prevent your vehicle from starting.
- Then have someone else sit inside of the vehicle. They are going to have to crank the engine over. Make sure they have everything turned off inside of the car.
- Have them turn the key to just before where the vehicle starts. Look at your ammeter and record the number shown. It should be 10-20 amps depending on your vehicle. You are going to have to subtract that from your amperage reading that you come up with.
- Now have them crank the engine for 5-10 seconds and watch the ammeter and record the amperage and then watch the voltage and record that also.
- Your vehicle should not drop below 9.6 volts again. For the amperage this is a little rule of thumb. For four cylinders you should have no more than 200 amps from your starter, six cylinders 250 amps max, and for eight cylinders 300 amps max. Do not forget to subtract the number with the key in the on position without cranking.
- We have just finished testing the starter and battery, we can now move onto the charging system. This again is easy to test and leave your load tester connected. You will also want to leave your ammeter connected.
- To test the alternator you will want to make sure that you reconnect the fuel pump. You will then want to take not of the amperage with the key on without the car cranking or running. This time you are going to want to add the amperage to your amperage you find in your testing.
- Have your helper start the vehicle and hold it at 2000 RPMs steadily.
- You are going to want to take your load tester and turn the dial on it to increase the load. You will want to keep turning it and watching the amperage. You will want to see where the amperage is highest at.
- Record the highest amperage rating you get from your test and add the amperage with the key on. Then compare the amperage rating to the amperage rating of your alternator.
You just finished diagnosing your vehicles starter, alternator, and battery. You will know be able to decide what action to take and how to fix any problems you have and just saved yourself a bunch of money.
Written by: Cody Mammenga an NDSCS Student
Tags: batteries, Battery, battery load test, battery testing